Friday, September 28, 2012

Winners: Tape challenge

Reminder: Our sparkle challenge is still open this week - be sure to enter!
 
Now let's talk about last week's challenge winners! Every creation was so great to see, especially reading about how people were inspired by this challenge. Here are the top 3 from the Tape challenge:
 

Be sure to visit their blogs and check out their amazing entries. So inspiring! Congratulations to each of you on a challenge well done! Please email May for the Top 3 Blinkie.
 
Now I'd like to thank Simon Says Stamp for another great chance to win a $50 voucher!!

The lucky (randomly drawn) winner for is...  16 Vada

Congratulations! Please claim your prize within the next two weeks by emailing May with your details. 
 
I'd like to thank everyone who took part in the challenge. It is always a joy to see what you create. I'd also like to say thank you again to Simon Says Stamp for their generosity - each week we give away a $50 gift voucher to the shop that you can use to buy all kinds of fabulous stamps, inks, and paper crafting supplies. Remember - you just need to enter the challenge each week to be entered into the drawing!

Monday, September 24, 2012

Challenge: For the Love of Sparkle

Distress stickles, perfect pearls mists, glitter, or just a sparkling subject - who doesn’t love a bit of sparkle in their life? From a hint of metallic to a full sheet of glitter paper - I can’t wait to see how your projects shine. Let's see what the design team has come up with this week-

Suzz had visions of vintage holiday decorations spinning through her mind when she heard sparkle. 
My mother always had vintage holiday decor spread through out the house at the holidays.  I wanted to create a holiday decoration that reminded me of her treasures. The La Blanche Santa makes the perfect focal point to my holiday decor.  He is nestled inside a ring of buttons.  I then added a layer of glittery leaves to soften the edges of the circle.  The end result is a metal star with layers of shimmer and sparkle.


Candy created three different sparkly vintage style ATCs depicting Fairytale characters. On this one, open the curtains and you'll see Red Riding Hood making her way to Grandma's house. 
I love vintage and stickles are a great way to re-create those beautiful old glittery postcards from yesteryear.  I have taken three vintage fairytale images and created sparkly and fun ATC cards.  Combinations of Waterfall, Fruit Punch, Platinum, Stardust, Lavender and Eucalyptus stickles bring these images to life. To compliment the stickles, I added some metallic dresden trim, red and aquamarine rhinestones, gold embossing powder, and some white opal liquid pearls to complete a real vintage feeling.
 

When Sandra Mouwen is in Halloween mode, she thinks, sleeps and breaths it.
I really love me some sparkle. As I'm already in Halloween mode, I wanted to make a sparkling but spooky card.  I inked my background orange with Ripe Persimmon of the fall distress inks. Then I stamped my beloved wallpaper stamp with black soot distress ink and used clear embossing powder over it so it shines. The little corked vials are perfect for Halloween projects. I put some embossing powder inside, and printed out some labels to place on the front of them. The wooden bats are actually my favorite wooden butterflies where I cut the bottom parts of the wings off.

Anna-Karin loves mica with its natural sparkle and imperfections and made a wall-hanging from a piece of cardboard:
I had so much fun making this sparkly project. The cardboard was covered in 7Gypsies Life Collage tissue paper, which as lots of great quotes printed on it, one of them about mica. The hearts were die-cut from grungeboard, each one was coated with different mica flakes and a button. I also placed some pink flakes in an Idea-ology vial bottle. Flowers gilded in embossing powders in my melting pot, crackle paint, lace, birds, and Rock Candy Distress Stickles completed the wall-hanging.

Tracy combined sparkle with natural elements to create her unique framed piece.
When I think of sparkle I automatically think of diamonds, well they are a girls best friend! Instead of diamonds for this piece, I accented the Art Parts shrine with aged gold embossing enamel. My owl better known as Big Eyes from Hero Arts has also been given the glamour treatment with a touch of sparkle added to his eyes (Jewel Brads). Natural elements and rustic pieces add to the rustic charm of my creation this week. I must get in touch with my sparkly side more often.


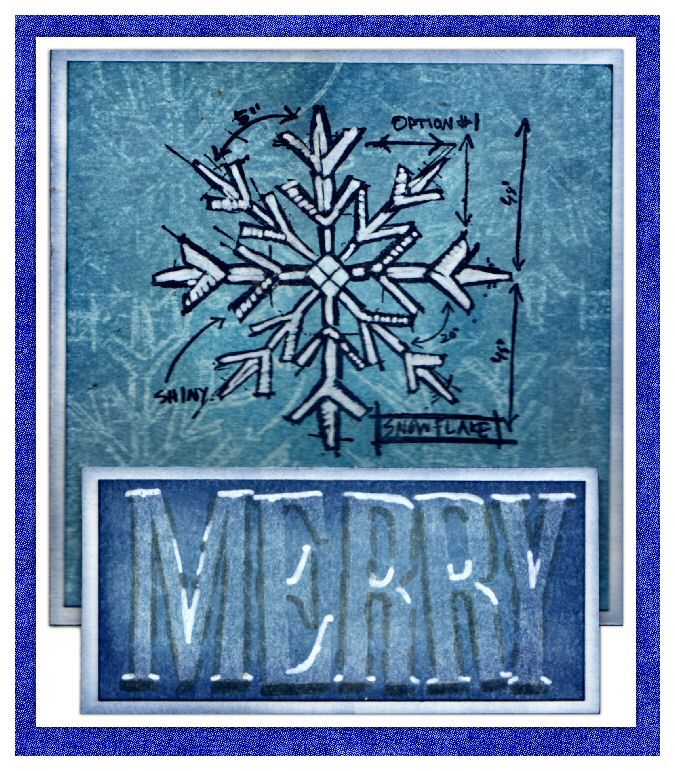
Dan is making a sparkling start to his holiday cards this week
The word sparkle only ever suggests one thing to me, winter time.  Although I may not feel it when I'm digging my car out of the snow, a snowy winter's landscape is so magical to me.  I love how the freshly fallen snow on the ground twinkles and sparkles when the light hits it.  I took the opportunity to give Tim Holtz's Christmas Blueprint stamps their first outing and the "merry" stamp is from Hero Arts Jolly Christmas clear stamps set.  Oh, and I almost forgot, the whole kaboodle is highlighted with a liberal application of Clear Rock Candy Distress Stickles to make it extra sparkly!


There is no hesitation when Ashli is told to get her sparkle on. In fact, she has trouble holding back!

I must admit, I am a sucker for all things shiny. And since it's all about sparkle this week, I was not about to hold back. If it was shiny, it made it on this layout! After free hand cutting some strips from Basic Gray's Paper Cottage collection, I glued on lines of Glitter, added Stickles, and sprinkled around the Sequins. A final touch of Glimmer Mist completes the sparkle party. The best part? All of the shiny goodness helps echo the light in this sweet photo.


Terry decorated a frame that sparkles with pearls and brown hues.
I love glitz and glimmer so I worked with lots of it on my project. I was inspired to create a vintage piece which began with a frame, adding gesso for texture  and adding many layers of interest using the chicken wire stencil. For the corners I worked with perfect pearls on Tim's corners to make it look rusty.  Last but not least I worked with UTEE on the frame and the effect it gave was very surprising to me. I just love it, it gives an old vintagy look. Inside my piece I placed the small purse and the wallet and decorated those with crackle and stickles. On the front I placed a dress form with lots of glitz onto the Wendy wings and I pulled the lace through a spool to make it look like a dress.


When Trace thinks of sparkle she see stars.
I LOVE stars, but growing up in the city I hardly ever got to see them. Fortunately now I live in the country, and I am able to admire the beauty of the night sky often.  This pretty star template by The Crafter's Workshop was the perfect starting point for my mixed media board. I love the look of the rock candy crackle paint by Tim Holtz in the center of the stars, it adds dimension and sparkle. The silver leaf pen by Krylon was perfect to add that intense shine around the words and on the frame. I finished the board by applying a coat of sparkle and shine spray by the Crafter's Companion.


    Sarah thought she would have one last play with her Summer colours before allowing the leafy and Festive colours to takeover...
 I love the vibrancy of the Summer Distress inks and think they can be used all year round on all sorts of projects. I'm not really a sparkly kind of gal but these bright tones are prefect when teamed with Distress Stickles and hearts...for that bit of bling with plenty of zing! I'm a big fan of Tim's Mixed Media stamps and think their versatility is just great. I just wanted to play with colour and ink and think creating a tag is the ideal to chance to make some mini-art and still have lots of inky fun!


I encourage you to check out each of the design team member's blogs for more photos, supply lists, and more. Simply click on their name (above the photo of their project) to visit their blog.

Now that we've shared the team creations - we're ready to see yours! As always, Simon Says Stamp is giving away a $50 gift voucher that will go to a random entry chosen by Random Generator. The challenge will close at 11:59pm Eastern time on Sunday, September 30th and the winner will be announced during the following week. To qualify all you need to do is create a new project that ties in (in any way!) with our theme and post it, along with a link back to this challenge, and add a link here.
For the full rules, read the "challenge rules" posted in the side-bar here on our blog.

We can't wait to see what you make!


Friday, September 21, 2012

Hero challenge winners!

Reminder: Our tape challenge is open this week - be sure to enter! Remember you can use tape, or tape-like anything (even a thin strip of paper!) for this project so don't miss your chance to take part.
 
Now let's talk about the Hero challenge winners! Every creation was so great to see, especially reading about how people were inspired by this challenge.Here are the top 3 from the Hero Challenge:


Be sure to visit their blogs and check out their amazing entries. So inspiring! Congratulations to each of you on a challenge well done! Please email May for the Top 3 Blinkie.
 
Now I'd like to thank Simon Says Stamp for another great chance to win a $50 voucher!!

The lucky (randomly drawn) winner for is...


Congratulations! Please claim your prize within the next two weeks by emailing May with your details.  
I'd like to thank everyone who took part in the challenge. It is always a joy to see what you create. I'd also like to say thank you again to Simon Says Stamp for their generosity - each week we give away a $50 gift voucher to the shop that you can use to buy all kinds of fabulous stamps, inks, and paper crafting supplies. Remember - you just need to enter the challenge each week to be entered into the drawing!

Wednesday, September 19, 2012

Guest Artist Tutorial by Hels Sheridan

Today I'm excited to share a tutorial by the talented Hels Sheridan! She joins us this week as our special guest, and to help inspire you for this week's challenge (info here- be sure to enter!) she is sharing a tutorial with us.


Use Cut & Dry foam to apply Adirondack Paint Dabbers to a wooden photo frame. Using Cut & Dry foam means that you will achieve a lovely blended effect and the paint will be nice and smooth to then pop the Tissue Tape onto. Either dry the frame naturally, or speed up with a heat tool, taking care not to overheat the paint.
Note: The colours I have used are Cloudy Blue and Juniper.

Use a liquid adhesive to help Tim Holtz Tissue Tape stick to the painted frame. Tissue Tape is tacky but adding a bit of extra wet glue to it helps it stick completely. Start by applying the butterfly tape, from the Sketchbook set of tape, all over the frame, wrapping it around the edges too. Burnish the tape using your finger so it is nice and smooth.

Next, still using the same technique, apply smaller pieces of the subway tape, from the Journeyman set, randomly over the frame in a collage style. Tear the Tissue Tape to make rougher edges to add that extra bit of detail to your design.  Apply washi tape in the same way – I have used a black and white stripy one.
Using the same piece of Cut & Dry foam you used to apply the paint, spritz lightly with water to refresh the paint and lightly pat over the frame. This will help blend the collaged tapes together to give them a uniform look. Use your finger to smudge away patches of the paint so the details on the tapes show through.

Isn't that a great tutorial? I'll definitely be trying this! Now, Hels is also sharing her 'how-to' for the beautiful embellishing that she's done on this piece...


Finishing accents:
Cut card to fit inside the frame. Paint this using the same piece of Cut & Dry foam, applying the paint in a pouncy fashion so it all blends together nicely.

Cut out a free form heart from two pieces of card and glue them together. This makes the heart embellishment stronger for applying the paint. Layer punched strips of card and more Tissue Tape onto the heart. Paint all over it in the same way as the insert.

When dry, apply shading around the punched layers and tape to add definition. Edge the heart and frame with gold embossing powder. Collect together Prima Flowers and make into a large floral embellishment. Place the insert into the frame and attach the heart to the insert using 3d foam. Glue the large floral embellishment to the heart using strong glue. Add some metal embellishments to the piece.

Finally, spray the flowers with a mica (or glimmer) spray to add some bling to them and pop little pearls into the flowers for that finishing bit of glamour.


A bit about our guest, Hels Sheridan:
I have been crafting in one form or another ever since I was a little girl when I used to cover myself, my Grandma, and anything that didn’t move in glitter and sticky stuff. My true passion for crafting really started about 10 years ago though. I began making cards for a hobby, branched into scrapbooking and then found rubber stamping. The rest, as they say, is history. There aren’t many days that I don’t create something and I like nothing better than to be in my Room of Stash, playing with ink and paint and generally making a mess. I am honoured to be on several UK design teams as well as designing for Craft Stamper magazine. I also appear on Create & Craft TV channel, demonstrating stamping and ink techniques and sharing my enthusiasm for all things altered and grungy. I teach workshops regularly and also demonstrate at craft shows and do in-store shop demo’s too. I guess you could say that I am completely addicted to all things crafty and I am very honoured to be a Guest Designer for Simon Says Stamp & Show.

To see more creative projects by Hels, visit her blog.

Monday, September 17, 2012

Challenge: Tape it Up!

Whether you’re using masking tape to create a mask on your project, layering up washi tape, using Tim Holtz tissue tape to add a layer of vintage funk, falling in love with Freckled Fawn's designs, or if you’re still hoarding that Cavallini tape and just haven’t used it yet - this week we want to see how you tape it up.
 
Self adhesive and ready to go, you can use tape anywhere in place of patterned paper strips, ribbon, or border stickers. In long strips or little bits - this product is both easy to use and available in colors and patterns for any style. Don’t have tape? grab a bit of tissue paper, a napkin, or a thin paper of any kind and cut it into a strip!

This week we're excited to have Hels Sheridan as our special guest, and we'll start off with her project:


To learn more about Hels and this project, and to check out a fantastic tutorial be sure to check out her post here on Wednesday!


Candy's seemingly old, paint peeling box is actually an optical illusion done with masking tape.  It's the perfect technique for this Tape It Up challenge!
I am fascinated with taking new things and making them look old.  With simple masking tape, I transformed this new box into an old, weathered box with peeling paint.  I wanted to keep the integrity of the aged look throughout this box, so I added a patina finish to the 7 Gypsies Antique Brass Corners and the Industrial Gears with a Juniper Paint Dabber.  The Spellbinders Fleur De Lis cardstock frame looks like antique brass.  It's background is created with Sketchbook Tissue Tape.  The dimensional dragonfly is created from Tim Holtz' new Classics #1 stamp set.

Dan recycled a small cardboard box to make this colourful money box.
I'm really loving all the great designs of paper tape that are available now.  They make it so easy to quickly add pattern and style to virtually anything - an old frame, a notebook cover or a quick card.  Luckily this challenge didn't say "favourite tape" or I would have really been stumped!  I seem to be collecting them, I've got tapes from Tim Holtz, 7 Gypsies and Cavallini, among others, and I used 3 Cavallini tapes on this money box, Alphabet, Numbers and Vintage Office.


Sandra Mouwen writes everything down on little memo notes, and tapes them all over her house.

I got this memo box as a gift with an order from a office supply store. I didn't like the way it looked, so why not alter it and make it into a gift for someone else? First I covered it completely (inside and out) with Studio Gesso because I was in the mood to play with paint, and let the gesso to dry. I used my favorite Paint Dabber colors, Lettuce and Pool, to color it up. It was too intense so I white washed it with some watered down gesso. To create some fun effects I used a tissue to lift some of the gesso off. I've used Queen & Company Polka Dots Green and Blue, and Sweet Bella Stripe Gold tapes. I used double strips of tape on top of each other so it became less translucent. Now I think I'm gonna keep it!


 Flowerpot labels featuring the fabulous Tim Holtz Tissue Tapes and Wendy Vecchi's butterflies came to mind as Terry crafted with tape this week.

I sat down at my craft table and really thought about how to create my Flowerpot Labels. I had the idea of bringing the products of Tim and Wendy together as I think their styles work so well together. I started out with the Sketchbok Tape, wrapped it around the label bases and sprayed some Glimmer mist on top to create a shiny effect. I used the darker tones of Walnut Stain on the butterflies, as well as Weathered Wood and Dried Marigold. The creative mind works in mysterious ways! I played around with UTEE on Wendy Vecchi's Just Flutterby Butterfly and Just Fly stamps and placed them on top of various Nestie die-cuts, which I stamped with the script from the Papillon Stamp set. I do love it when a plan comes together.


Anna-Karin made two cards featuring different ways of using tissue and washi tape.
I both stamped on and die-cut tape on these two cards. After adhering tissue tape to white paper, I cut it using the Sizzix Mini Ornamental die. The frame on the second card was also die-cut, by using Love My Tapes washi tape and placing the Mini Ornamental in the Ornamental Bigz die. The panels were stamped with Hero Arts Fleurettes and Etched Flower and coloured with Twinkling H20s and alcohol inks. I love ledger papers, and used 7 Gypsies Postale Ledger papers on these cards.


Trace is making her design team debut today - so be sure to pop by her blog and welcome her too! She wanted to take washi tape to the next level for this special card.
I love to make my own custom product so I can use my favorite stamps and ink colours. For this card it was easy to make my own washi tape using double sided Scor-Tape, tissue paper, and some stamps. I used stamps from Impression Obsession Flourishes, Sm. Quatrefoil, and Hero Arts Dot Flower Pattern. What you really can't see too well in the photo is that I also embossed the inked images with clear embossing powder, something you don't usually see with washi tape. To add even more shine to the card, I decided to use these beautiful Vintage Trinkets from Maya Road that I have been hoarding for quite some time. 

Suzz was thinking of how to create a background effect using the 7 Gypsies Paper tape
I started my project with using the paper tape and creating a brick like effect on the background.  After my panel was complete I realized it looked more like a panel.  This inspired me to create an Asian themed panel hanging from an gold embossed stand.  I used the Stampendous Jumbo Cling Hollyhock to create my cherry blossoms and the Stampendous Dragonfly Vine for my wings to soar. 

When Ashli hears the word "tape," all she can think is WASHI! This was the perfect challenge to put one of her favorite supplies to use.

Oh, I do love me some washi! For this layout, I put my tape stash to work. Isn't that heart and cloud design fabulous? And you know what? I just don't use it enough. Time for that to change. After covering some chip board scraps, I ran them through my Sizzix to create the heart embellishments. The black and white tape provides the perfect contrast and mat for my photo. A bit of looped twine hangs the hearts and adds texture. Life is good. Life with washi is better!

Sarah loves to create her own custom made tape to jazz up two of her cards...
 I'm a huge fan of rubber stamps but I'm always on the look out for ways to get more out of my stash and I'm also a big fan of creating my own take on something. I decided to create my own mixed media tape using a sheet of paper and double sided sticky tape. I created a masterboard using Tims Mixed Media stamps, Stuff to Say numbers, Wendy dots, inky rings and splashes of Dylusions ink spray! A little cutting and tearing, then more Tim stamps for good measure and a sentiment to finish off. Custom made tape is fun!


Tracy was inspired by a 7 Gypsies Tryptich Arch and Tidings Tissue Tape this week to create her seasonal textural piece.
I always begin a creative process thinking how can I add texture and dimension to my pieces and this time around texture came in the form of Gesso applied through a stencil. I love my pieces to be tactile and offer lots of interest to the recipient which in this case will be a family member. Further texture is achieved adding UTEE to a Kaiser Wooden Reindeer; stamping into the hot enamel with the background stamp from the Season's Silhouettes. Lots of dimension always makes me happy!

I (May) will be the final one to share here - and I do love my tapes! I especially like to use them on configurations boxes for holiday decor.

My project blends my holiday crafting with finding uses for treasure from outside the papercrafting isles of the craft store. The doggies I found on clearance - they were meant for one of those Halloween villages but of course they're the perfect size for a scene inside my spooky box. The cut out branch tree and the Halloween Night texture fades inked up a bit along with some stickers, and plenty of Tim's tissue tape made this a fun (and surprisingly fast!) project to make. Now it is up on my mantle along with my configurations box from last year.

I encourage you to check out each of the design team member's blogs for more photos, supply lists, and more. Simply click on their name (above the photo of their project) to visit their blog.

Now that we've shared the team creations - we're ready to see yours! As always, Simon Says Stamp is giving away a $50 gift voucher that will go to a random entry chosen by Random Generator. The challenge will close at 11:59pm Eastern time on Sunday, September 23rd and the winner will be announced during the following week. To qualify all you need to do is create a new project that ties in with our theme and post it, along with a link back to this challenge, and add a link here.
For the full rules, read the "challenge rules" posted in the side-bar here on our blog.

We can't wait to see what you make!


Wednesday, September 12, 2012

9.12.2012: Announcements

I have some winners to announce from last week’s challenge, but first, I have another kind of announcement to make!

Simon Says Stamp and Show is excited to announce that Tracey Kuznak is joining our design team!


She is a regular participant around here - you may have seen some of her beautiful creations before. Tracey is from Canada and has enjoyed crafting since childhood. She loves inky techniques and can be found blogging regularly here.

We’re excited to have her join us – watch Monday for her debut project and to see a project by a very special guest as well. Lots of exciting things happening here  - and we love sharing it all with you!

Reminder: the Hero challenge is still open - and with $50 to www.simonsaysstamp.com at stake - you should be sure to enter here!!


Now let's talk about the "Read all about it" challenge and the top 3, as well as the winner of our special STAMPTEMBER blog hop and challenge last week!

Note: if you hopped around our design team's blogs, be sure to check back in and see if you've won a prize from one of us!


I'd like to thank Simon Says Stamp for the super generous $100 they are offering up for this special challenge! If you aren't already - be sure to follow Simon's blog to see all kinds of STAMPTEMBER fun! The lucky (randomly drawn) winner for is...

140 Mark

Congratulations! Please claim your prize within the next two weeks by emailing May with your details.

Each week in addition to randomly drawing a winner from the entries to win a voucher to Simon Says Stamp, the design team also nominates their favorite entries for our weekly top 3. There was so much great use of text, papers, and stamping this week - as with every week - your entries blow us away! I was thinking for this week I might have to make a new 'top 10' blinkie - but eventually we got it narrowed down as we always do. No easy task! Here are this week's top 3:


Be sure to visit their blogs and check out their amazing entries. So inspiring! Congratulations to each of you on a challenge well done! Please email May for the Top 3 Blinkie.

 
I'd like to thank everyone who took part in the challenge. It is always a joy to see what you create. I'd also like to say thank you again to Simon Says Stamp for their generosity - each week we give away a gift voucher to the shop that you can use to buy all kinds of fabulous stamps, inks, and paper crafting supplies. Remember - you just need to enter the challenge each week to be entered into the drawing!

Monday, September 10, 2012

Challenge: Hero

Do you have a hero you want to talk about in your next art journal entry? A card for someone special you’d like to make? A superhero themed something to create? Or perhaps you want to cheer with glee for your favorite Hero Arts stamp! Whatever hero inspires you – we can’t wait to see your creation. Here are the design team creations for the week:

As soon as Tracy saw the hero challenge she knew that she had to use the Charles and Amelia plate from Artistic Outpost.
I admire anyone who follows their dreams and that is exactly what the famous aviators Charles Lindbergh and Amelia Earhart did, accomplishing flights across the Atlantic Ocean. Charles was the first pilot to fly solo and Amelia was the second person in the world to make the journey by air.  I used the fabulous riveted patchwork technique from Tim's A Compendium Of Curiosities Volume ll using Metal Foil Sheets to give the perfect industrial feel for my aviation tag.


As the total movie addict Sandra Mouwen is, she made her first canvas inspired by the movie The Dark Knight Rises.


I was a bit nervous and wasn't sure what to do when I started. But when I pushed myself to go on and let loose, I made the first layer of paint using bubblewrap as a dabber. Then a bunch of layers followed. I had lots of fun embellishing it with the wooden stars, the ball chain, the sprocket gear and the game spinner. The logo I traced of an image of the internet and cut it out with my Silhouette Cameo! The folds are made with the Martha Stewart Scoring Board. To adhere all things down I used lots and lots of Multi Medium Matte.


Candy and Tracy were on the same inspiration wave length when it came to Artistic Outpost's Charles and Amelia stamp set.

The minute I saw Artistic Outposts' Charles and Amelia stamp set, it reminded me of my favorite picture of my Dad taken at the beginning of his military service during World War II.  This triptych frame honoring Heroes, especially my Dad, was born out of those memories.  The chipboard frame is covered with Ranger's Metal Foil Sheets.  "HERO" and the stars are faux embossed thanks to Tim Holtz' Mixed Minis.  Detailing of the faux welded sheet metal is achieved with Ten Seconds Studio's Cool Tools and Ball And Cup Sets.


Everyone needs a hero in their life and Ashli is lucky enough to be married to one of hers!  
My husband really is a hero in my life, for so many reasons. What fun it was to do a layout celebrating him! First, I put another type of hero to good use: Hero Arts Cling Rubber Stamps. Once my stamped patterns were dry, I cut strips to layer over the gorgeous sunburst paper from Basic Grey. A Heidi Swapp Color Magic Memory File cut to size makes the perfect little folder for my journaling. And, of course, some Pink Paislee and Studio Calico letter stickers finish off this interactive element. A final touch of little wood arrows along side the sun rays help point the eye to my hubbs, my hero!

Anna-Karin was inspired by a stamp and made a very inky and colourful layout with an important message:

When I saw this sentiment on the new Stamper’s Anonymous Classics set #5, I immediately knew what I wanted to do for the hero challenge. The base of the layout is watercolour paper and quite a number of the Classics stamps were clear embossed, before misting with Dylusions spray inks. I love birds, and cut the Sizzix Bird Branch and Mini Bird from grungeboard, painted with Rock Candy Distress Crackle Paint and inked with Distress Stains. I just had to use some game spinners too; they add such fun direction and movement to a layout. 


Suzz's brother, niece, sister-in-law, grandfather, father-in-law either served, will be serving or are currently serving the U.S.A. military.  They were the inspiration for Suzz's project:

My card celebrates the heroes who serve for us. I used the American flag and the vintage soldier from the Artistic Outpost Hero plate. I added the U.S.A. Image from the Artistic Outpost  She-Roe plate to bring another pop of black into the design. The banners were embossed using the Cuttlebug Stars Embossing Folder.  This is for all our Heroes who serve and protect us everyday.


Terry was inspired to make a tag this week.
I just had to use the new Stampset from Artistic Outpost, Charles and Amelia, I think it was such an adventure from Charles and Amelia to fly across the Atlantic Ocean and a great accomplishment. I have great respect for them. On this tag I have played with lots of distress stains, distress inks and the white paint dabber. I had an idea to emboss the metal foil with the springtime embossing folder from Tim Holtz to give it a swirly look. To finish my tag I played with utee on the image and placed some game spinners and sprocket gears


Sarah was inspired by the opening of the London 2012 Olympic Games to create a Steampunk style tribute to the heroes of the Industrial Revolution.
 
When I saw the opening ceremony of the Olympics I was really made to think about how much we owe to the forefathers of industry, invention and innovation. I mean... where would be without machinery, engineering and architecture? So I dived into one of my favourite styles and designed a Steampunk card full of metalwork, gadgetry and rusty tones. I layered up Kraft Resist Paper with an embossed Metal Foil Frame and piled on the Idea-ology, with Wendy Vecchi's Steampunk Gent as the perfect inventive genius. Next time you cross an impressive bridge or ascend to the 58th floor, take a moment to think of the mind that created the possibility. 

Finally, I (May) was inspired to make a card to send to one of my own heroes.
I just love using the new oversized Ranger tags as cards as I have here. Spraying alcohol ink with my compressed air (that is normally used for my computer!), stamping some stars with gold paint, and finishing it off with a bit of tinsel and my super hero stamp, this card was a lot of fun to make. I wanted to keep it somewhat fun and playful, and I hope that the note I add inside makes this person smile.

 I encourage you to check out each of the design team member's blogs for more photos, supply lists, and more. Simply click on their name (above the photo of their project) to visit their blog.

Now that we've shared the team creations - we're ready to see yours! As always, Simon Says Stamp is giving away a $50 gift voucher that will go to a random entry chosen by Random Generator. The challenge will close at 11:59pm Eastern time on Sunday, September 16th and the winner will be announced during the following week. To qualify all you need to do is create a new project that ties in with our theme and post it, along with a link back to this challenge, and add a link here.
For the full rules, read the "challenge rules" posted in the side-bar here on our blog.

We can't wait to see what you make!


Thursday, September 6, 2012

Winners announced: Summer Distress

Reminder: our blog hop and challenge for this week is still open - and with $100 to www.simonsaysstamp.com at stake - you should be sure to enter here!!


Now let's talk about the Summer Distress challenge winners! Every creation was so great to see, and so much variety from winter creations to art journals to tags - loved it! If you've not yet picked up the summer distress inks I strongly recommend them. They're awesome colors!


Here are the top 3 from the Inspired by Summer Distress challenge:

13 Chris Dark
58 Donna Gibson
78 Barb Albrecht

Be sure to visit their blogs and check out their amazing entries. So inspiring! Congratulations to each of you on a challenge well done! Please email May for the Top 3 Blinkie.

Now I'd like to thank Simon Says Stamp for another great chance to win a $50 voucher!!

The lucky (randomly drawn) winner for is...

26 Caro

Congratulations! Please claim your prize within the next two weeks by emailing May with your details.

 
I'd like to thank everyone who took part in the challenge. It is always a joy to see what you create. I'd also like to say thank you again to Simon Says Stamp for their generosity - each week we give away a $50 gift voucher to the shop that you can use to buy all kinds of fabulous stamps, inks, and paper crafting supplies. Remember - you just need to enter the challenge each week to be entered into the drawing!

We've got a lot of great challenges coming your way - as well as some really inspiring guests coming up and a new design team member to be announced next week... Stay tuned!