Monday, October 29, 2012

Challenge: Just add Pearl

When dressing up, you really can’t go wrong with pearls. The same can be said for crafting projects! Whether you add pearl accents, a strand of pearl-like beads, perfect pearls, or pearlized mists - there are lots of ways to add pearl to your projects. This week, the challenge is to add pearl.

Will you stamp and pearlize with perfect pearls? Mist with glimmer mist? Use up some of those lovely self-adhesive colored pearls that you have in your treasure trove of supplies? I can’t wait to see what you come up with this week!

I (May) can't get enough of perfect pearls mists and powders, and I took this challenge as an opportunity to create a card featuring them in three different ways.

One of my favorite pearl tricks is to color a stamp with Distress Markers, then spritz with Perfect Pearls mist and stamp. This gives a gentle watercolor effect, as well as adding a pearlized shimmer to my stamped image. One of my favorite things about using perfect pearls is that in some light, it looks flat, but let the light hit it just right and you have an explosion of sparkle! For this card I also used perfect pearls mist on the background, and perfect pearls powder with perfect medium to create the chicken wire you see on the background.

Sandra Mouwen couldn't resist to add lots of pearl to her project.
Recently I bought this art journal and I wanted to make a double page with my favorite theme, Halloween. My inspiration came from a Halloween tag I made a few weeks ago with the interior of a haunted house. I started with some Dylusion ink sprays for my first layer, but soon it took a whole other direction when I covered almost everything with Gold Paint Dabber. I did a lot of die cutting with my trusty Vagabond, like on the Fence, the Branch Tree and of course the Dress Form. Like always, I enjoyed dressing it up! I spritzed some Crushed Grape Dylusions Spray over it and just had to add some Accents Pearls on it!

 
When Candy thinks of pearls, it conjures up a nostalgic, shabby chic feeling.  She has created this vintage tag inspired by the lovely woman she has appropriately named "Pearl".
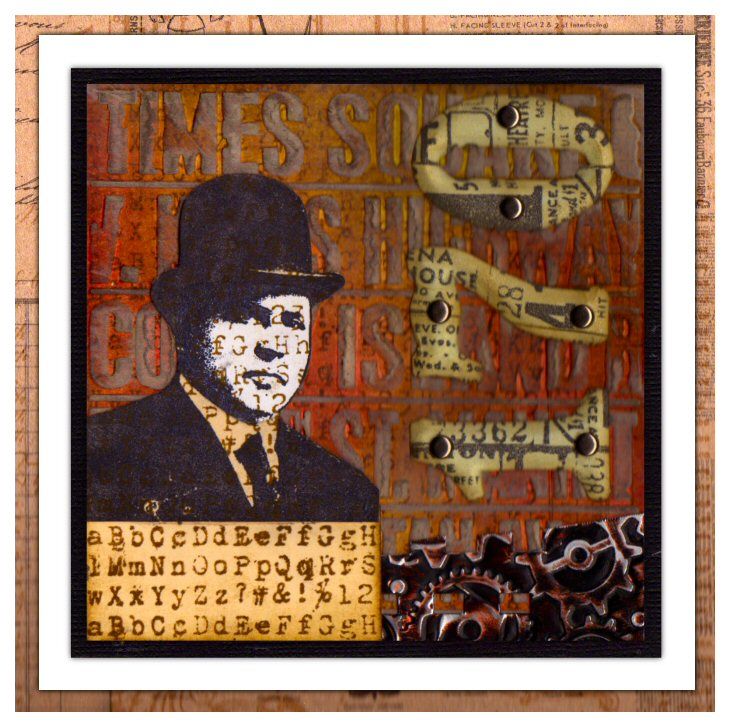
I took the theme of "pearl" literally and figuratively when creating this vintage #10 Sized Manila Tag.  There are pearls in the centers of Tim Holtz' Trimmings Organza Ribbon Roses and trailing from the die cut spool of Tim Holtz' On The Edge Sewing.  The buttons on the card are made to look like pearl buttons courtesy of Glossy Accents.  The vintage portrait, printed onto Claudine Hellmuth's Natural Sticky Back Canvas is partially colorized using a shimmery "paint" made from Pink Gumball and Sour Apple Perfect Pearls Powders blended with a Small Sakura Waterbrush.  Perfect Pearls are also randomly dry brushed on this vintage beauty to provide that unmistakable Perfect Pearls sparkle.
 
 
Inspiration came in the form of paint and texture for Tracy this week in her pearlized Christmas arch.
I really wanted to try a different colour palette this week for my Christmas creation and that colour came in the form of  Claudine Hellmuth's Studio acrylic paint in modern red, perfect for a traditional Christmas piece, toning down the vibrancy a little with snow cap Paint Dabber. No Christmas creation would be complete without a touch of pearl which I have added using Liquid Pearls white opal through a Dylusions Let It Snow stencil. Add into the mix some Melissa Frances cream pearls and my arch is pearlized to perfection!
 

Pearls make Ashli think of all things fancy and precious. Scrapping a layout about her oldest daughter is just perfect for such an occasion!
When I think of pearls, I think of special occasions, precious moments, and all things fancy. Since today is my oldest daughter's birthday, I figured this was the perfect time to scrap a layout all about how amazing and precious she truly is! I started with a plain kraft page and using lots of spritz, stencils, inks and Perfect Pearls, I was able to achieve a fun and playful background. I then hand cut some Crate Paper into strips to layer up around my photos. A few little pinked circles punched out and layered up with pop dots gave me the perfect spot for the Jenni Bowlin Pearl Stick Pins. A final touch of Hero Arts Pearls complete this special page about my precious girl.
 
 
Trace is so addicted to her Perfect Pearls spritzing. She loves to spray it on almost everything!
 This beautiful stamp is called Flower Dot Pattern and it is from Hero Arts.  When I am going to colour in an image, I always emboss my stamped images with Hero Arts white embossing powder, it makes colouring easier and helps you stay in the lines. My most favorite way to use my Perfect Pearls powder is to mix it with water in a Ranger Mini Mister. It works exceptionally well on projects coloured with Tim Holtz Distress Markers...or any of the Distress line of products. Just spray and watch the magic happen.


Anna-Karin made a little autumn accordion fold book:
My project is not what you would normally think about when hearing the word ‘pearl’. I wanted to use some bottles of Ranger’s Liquid Pearls, which I hadn’t opened yet. They had autumn colours and were perfect together with the Stamper’s Anonymous Tim Holtz Autumn Blueprint stamps. I wanted to really showcase the stamps in a little booklet. The stamping was done with Archival Jet Black, after masking the leaves the background was watercoloured with Distress Stains and the leaves were painted with Liquid Pearls. There are more leaves, stamping and pearls on the cover.
 

Suzz  decided to uses pearls and pearl spray to shimmer and glamour up a card.
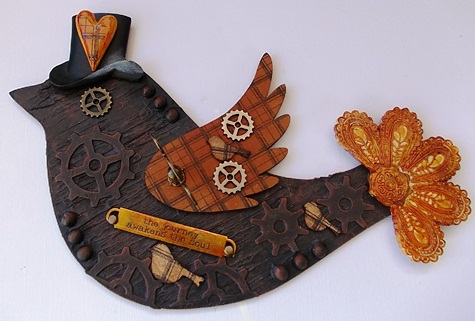
I am always looking for birthday cards and wanted a special one for my younger sister.  She loves her garden and will appreciate all the flowers and pearls.  I used the Hero Arts Fabulous Flourish and Big clock to set the backdrop for my Artistic Outpost Birds.  The Prima Flowers and Clock accents add texture around my birds.


Terry loves pearls and loves her Mom dearly, so she decided to make a pearly wrapped present for her Mom's 70th Birthday.
I made a little envelope with a corrugated heart for my Mom's 70th birthday but since this is such a special age I thought to myself that a little envelope was nearly not enough to give as a present to my Mom. So I altered a box and decided to use the fabulous Papers from Graphic45 and worked with lots of pearls and lace. I colored the lace with Rusty Hinge to give it a orange look and on top I placed the butterflies from The Tim and this Gorgeous Rose. To finish my Mom's present I placed pearls on top of the box and Spinners. 


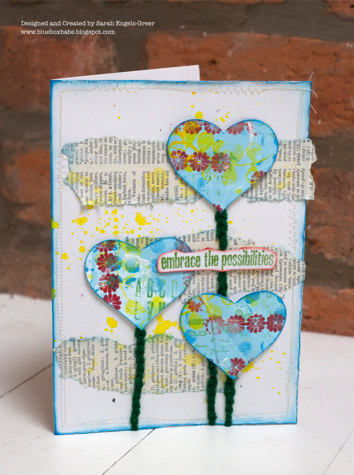
Sarah decided to create a dimensional tag and thought shades of blue would be the perfect contrast to her bright flower.
Sometimes you need a bit of ink and a really uplifting motivational sentiment to start your day and where better to look than amongst my Wendy Vecchi stamp collection! I also wanted to show how even just one Art Part, this flower, can add a wonderful dimensional focal point to a piece. I love this background bubble stamp and of course a whisper of Blue Patina Perfect Pearls gives that touch of shimmer. I felt my it needed a bit of extra body so a second layered tag did the trick.

 
Sugar-crazed spectres will soon be tapping on Dan's door and he's been getting prepared by making these ghoulish candy cartons.
Trick or Treat isn't a tradition we have here in the UK, but year on year the knocks on my door on Halloween have started to increase so I thought I'd make these mini milk cartons to hold candy to give out to any spooky visitors who come-a-calling.  Perfect Pearls Pewter provided a haunting dose of ghostly shimmer, both on the spiders webs and as a general highlight in several areas.  I dipped into several stamp sets here, including Haunted Mansion, Creative Muse, Retro Halloween, Mini Halloween and Odds and Ends.


I encourage you to check out each of the design team member's blogs for more photos, supply lists, and more. Simply click on their name (above the photo of their project) to visit their blog.

Now that we've shared the team creations - we're ready to see yours! As always, Simon Says Stamp is giving away a $50 gift voucher that will go to a random entry chosen by Random Generator. The challenge will close at 11:59pm Eastern time on Sunday, November 4th and the winner will be announced during the following week. To qualify all you need to do is create a new project that ties in (in any way!) with our theme and post it, along with a link back to this challenge, and add a link here.
For the full rules, read the "challenge rules" posted in the side-bar here on our blog.

We can't wait to see what you make!


Friday, October 26, 2012

Winners: The favorite challenge

Reminder: This week's Wendy Vecchi inspired challenge is still open - be sure to enter!
 
I'd like to thank Simon Says Stamp for another great chance to win a $50 voucher!!

The lucky (randomly drawn) winner for that is...

123 Christy S

Congratulations! Please claim your prize within the next two weeks by emailing May with your details.

Now let's talk about the top 3 projects as chosen by the Stamp & Show design team. With more than 200 entries it was no easy choice - I know we were all blown away and totally inspired by your take on this challenge! This week the honors go to:

6 die amelie
24 elly
25 gillian

Be sure to visit their blogs and check out their amazing entries. So inspiring! Congratulations to each of you on a challenge well done! Please email May for the Top 3 Blinkie.
 
I'd like to thank everyone who took part in the challenge. It is always a joy to see what you create. I'd also like to say thank you again to Simon Says Stamp for their generosity - each week we give away a $50 gift voucher to the shop that you can use to buy all kinds of fabulous stamps, inks, and paper crafting supplies. Remember - you just need to enter the challenge each week to be entered into the drawing!

Wednesday, October 24, 2012

Guest tutorial: Wendy Vecchi

Wendy Vecchi is our guest this week - and we couldn't be more thrilled! She has authored several amazing books, designs stamps, embellishments, art parts, and more - teaches all over the United States and attends events, blogs, is a Senior Educator for Ranger, and so much more! In short, she is a fantastic woman and an amazing artist. We're THRILLED to have her be our guest in this week's challenge (which is still open - enter in the post below this one!!)

Now what could be even better? Well, how about not one but two tutorials and projects from Wendy? Hooray! The ideas, techniques, and inspiration she shares in these projects would work on a variety of things - from cards to scrapbook pages and I can't wait to try some of these ideas out.

Without further ado - here are her two gift bags:


Supplies:
holly (card art essentials), polka dots (seriously art), background stamp (dressed for art), polka dot/stripes border stencil, jet black archival ink, Heat -It craft tool, blending tool with foam, clear embossing powder, multi medium, mister with water, heirloom gold Perfect Pearls mist, Claudine Hellmuth Studio sticky back canvas natural, manila tag, kraft cardstock, non stick craft sheet,
scattered straw distress stain, peeled paint, walnut stain, rusty hinge & black soot distress ink, barn door distress marker, barn door distress stickles, distressed doily Sizzix Die, alpha parts, also used: 3 black rhinestones, waterproof pen, kraft gift bag, foam dot/grungeboard scraps


Instructions:
1. Heavily mist the bag front with the Perfect Pearls mist. Let it pool in areas, and dry with the
heat-it tool.
2. Add shading to the edges with walnut stain on the blending tool.
3. Use black soot on the blending tool to stencil a row of polka dots about 3/4 of an inch
from the top and bottom of the bag.
4. Cut the sticky back canvas to approximately 3 1/2 x 3, then remove the backing from the
sticky back canvas and adhere to the craft sheet.
5. Mist the canvas with water, then apply scattered straw stain over the canvas. use a clean blending tool to spread the ink and dry, then using the blending tool add a bit of rusty hinge to the center of the canvas, use jet black and stamp the background over the canvas and dry.
6. Remove canvas from craft sheet and add to the bag. add pen stitching detail around the canvas
7. Use jet black to stamp the holly four times on a manila tag. while the ink is wet, sprinkle with clear embossing powder, then heat to emboss. Cut out two full holly and just the top leaf from the other two.
8. Ink the holly leaves with peeled paint, using the blending tool, then use jet black to stamp the polka dots over the holly .
9. Use the barn door marker to color the berries, then accent with barn door distress stickles.
10.Glue the holly with a dimensional dot between the leaves and glue to the bag as shown.
11.Add the “for you” with alpha parts.
12. Die cut the doily from kraft cardstock and mist with heirloom gold Perfect Pearls mist. Dry, then adhere to the inside of the bag, using multi medium.
13. Accent two corners with 3 black rhinestones.
14. Fill with a little something for that special someone.

As seen in our challenge post - Wendy's second project!


Supply list:
polka dots (seriously art), leaf (funky flower art), flourish (my kind of art), saying (card art essentials), text (botanical art)large & small 6 petal flower (potpourri of parts), polka dot/stripes border stencil, clearly for artjet black archival ink, Heat -It craft tool, blending tool with foam, Glue N Seal matte finish, brayer, non stick craft sheet, Wonder Tape, barn door & peeled paint distress stain, black soot & brushed corduroy distress ink, Tim Holtz black paper string, green tinsel twine, also used: 3 yellow-ish rhinestones, waterproof pen, kraft gift bag, foam dot/grungeboard scraps, vintage dictionary page, glue gun


Instructions:
1. Ink over the bag with brushed corduroy, using the blending tool
2. Fill the bag to make a solid stamping surface- I used acrylic blocks. Use black soot on the blending tool to stencil a thin border at the bottom of the bag and a thicker border at the top of the bag. Use a pen to draw a line at the bottom of the top border.
3. Use jet black to stamp the saying at the bottom center of the bag, as well as to stamp one flourish as shown in the photo.
4. Ink the two art parts flowers with barn door stain and dry. Then use jet black to stamp text on the larger flower and polka dots on the smaller, and glue together.
5. Use Glue N Seal to adhere a vintage dictionary page to the Clearly for Art, brayer and dry.
6. Then use jet black to stamp the leaf 3 times on the paper side (of clearly for Art) and cut out.
7. Ink the leaves with peeled paint stain and dry
note: you’ll see that the benefit of using stain is that it soaks thru the paper and colors the back too!
8. Heat the leaves to soften the Clearly For Art & while warm, shape to look like poinsettia leaves.
9.Use hot glue to glue the leaves to the bag, then add a grunge scrap under the flower and glue in place over the leaves.
10. Cut a thin strip of Wonder Tape and add above the bottom border. this is GREAT for holding the tinsel twine in place.
11. Finish the bag by adding 3 yellow rhinestones to the center of the poinsettia, and embellish the handles with a black paper string bow.


HUGE THANK YOU to Wendy Vecchi for sharing these awesome projects with us and being such an inspiration! You can see more of Wendy's creations at her blog, and of course her products are available for sale in the Simon Says Stamp shop.

Be sure to check out how our design team was inspired by Wendy this week in the post below this one- and join the challenge too!

Monday, October 22, 2012

Challenge: Inspired by Wendy Vecchi

When it comes to inspiring, few people are more so than Wendy Vecchi, Senior Ranger Educator, designer, author, and all around creative maven. Simon Says Stamp stocks hundreds of her vintage inspired unique products - you can check out all of her stamps, stencils, embellishments, and art parts at the shop. Yes, this week we welcome Wendy as our guest and as the inspiration for our challenge!
Whether you’re inspired by her signature style, want to play with some of her stamps, art parts, or blossom bucket accents, or try one of her fantastic techniques featuring Ranger products we invite you to be inspired by the art or techniques of Wendy Vecchi this week.  Wendy is a senior educator for Ranger, so using any of their products can qualify you for this challenge as well! You could color accents with distress inks, use some of her Blossom Bucket products, Stamper's Anonymous Stamps, Art Parts, or just be inspired by her and run your own direction. 

ATTENTION WENDY FANS!!!! Simon Says Stamp has a super deal for you. To receive 25% off ALL of your Wendy Vecchi purchases this week please use code: wendyart
--when you check out.
To redeem your this coupon, just visit www.SimonSaysStamp.com and pick out your favorite
Wendy Vecchi brand products. When you go to check out, enter the promotion code wendyart
at the bottom of the page that says "Billing & Shipping" at the top. There will be a box for you
to enter your promotion code which will automatically deduct the discounted amount from your
total upon check out. When entering your code please do not add any spaces and be sure it is
entered in all lower case.


Sale ends on 10/29/12 at 11:59 PM EST

To give you more ideas - first take a look at projects our design teams created inspired by Wendy - as well as a project from Wendy herself. 


Let's kick things off with Wendy Vecchi's first project that she created for us!
Wendy says:  this is a very simple design to recreate for other occasions...
change the saying...change the flower color and you’ll have a birthday bag...or congrats
bag... there are lots of fun possibilities!
Wendy used her six petal art part flowers, dot and stripe stencil, leaf stamp, holiday sentiment stamp, and so much more. I love how her products mix and match so beautifully with each other - not to mention how nicely they play with my favorite papers and other brands too. Check back in on Wednesday - you'll see the full supply list and how-to for this project as well as a second project (with tutorial!) from Wendy. She's such an inspiration!


Now let's see how the team was inspired! First up, Sandra Mouwen went all bright with her Wendy Vecchi inspired canvas.
Wendy's style and products are gorgeous! This week I made a canvas and was in the mood for some bright colors. First I stamped with Wendy's I am My Art Stamp set and Archival Jet Black Ink on some plain tissue paper. Then I did lots of  layers with paint and stamps to create some texture. To secure each layer I used lots of Multi Medium Matte. What really made my canvas is the Leaves Art Parts and the always fun to play with flower White Clicker Cutts.


Art Parts were the inspiration for Tracy's quirky steampunk piece this week.
This piece uses everything I love,  a bird in the form of the Art Parts birds with wings; dimensional embellishments from Blossom Bucket, the quirky black top hat, cream hearts, and the floral pattern trinket. This piece has been enjoyable to create from start to finish, helped by the fact that I love birds, hearts and dimension and all used in abundance. Its such a pleasure to create when the process is so enjoyable!


Ashli has actually never included one of Wendy Vecchi's fabulous products on a layout. This week was the perfect excuse to remedy that!
Look at those fabulous little Heart Trinkets! The minute I saw them, I knew they would be perfect for scrapping this special family event. After stamping and spritzing up my background, I roughly cut some square frames from the Basic Grey Paper Cottage collection.  Some scalloped circles and Doily Punched shapes provided the perfect nesting spot for the Blossom Bucket Red Hearts. A bit of twine and washi finished off this page where other than the photos, the Wendy Vecchi Trinkets are the stars!


The house that Wendy Vecchi built!  That is the theme for Candy's dimensional steampunk style house.  Her inspiration is that very popular song she can't get out of her head, "Call Me Maybe" by Carly Rae Jepsen.
I love Wendy Vecchi's Studio 490 stamps and Art Parts.  As you can see by this piece (even with the door closed), I have used several of them.  The brick background is Wendy's new Brick Stencil done with Gesso and colorized with Fired Brick Distress InkGentleman's Art, Call It Art, European Art and An Eye For Art are just some of the stamp sets used in bringing this steampunk piece together.  And what would a steampunk house be without Wendy's Art Parts Steampunk Gears and More? Open the door and find lots more quirky Studio 490 fun on the inside!


Sue was inspired by this Wendy Vecchi Post and created a page in her Art Journal.
Wendy's page had this star that immediately caught my attention.  The star made me think of when you wish upon a star and Peter Pan. To create my page I started with a layer of Glimmer Mist and Adirondack Snow Cap Acrylic paint blended together. I used  Wendy's  Just Word Art stamps from Stampers Anonymous with the sweet images from Artistic Outpost's Neverland to create my star inspired journal page.  

Trace fell in love with Wendy Vecchi's brilliant technique of colouring molding paste with Tim Holtz Distress markers.
What a fabulous idea Wendy! I didn't want to just straight out and copy her, so I added my own twist and coloured in the molding paste with my Faber-Castell Big Brushes. The background watercolor paper was handmade using Dylusional inks in colours fresh lime, cut grass, vibrant turquoise, and london blue....I just love these inks and their vibrancy! To add a little more depth to the background I used The Crafter's Workshop chickenwire stencil and Pan Pastels....a real staple for the mixed media artist! To make the board "sing" I added Studio 490 Blossom Bucket resin hearts to the center of each flower...love these "wood look" hearts!


A dimensional flower is the star of Anna-Karin’s Wendy Vecchi inspired circle frame.
I love the Clearly for Art Modeling Film and use it often. For this project, I made a dimensional flower using modeling film, stamps, Stazon Cotton White and Platinum ink and the Tattered Florals die. The flower got a lovely Blossom Bucket Lace Leaf which was painted. The frame is made of Wendy Vecchi’s fun Art Parts Large Circle Frame. The base was painted and stamped and the frame was painted silver and coated with Rock Candy Distress Crackle paint.

This dapper man about town is one of the Studio 490 stamps and one of Dan's favourites.
While I was making this card I kept thinking about "The Apprentice", though I'm not too sure why.  I'm coming down with a cold and my head is a bit woozy so your guess is as good as mine!  This man is such a great stamp that I think he deserves a name, any suggestions?  I covered some Tim Holtz Numerals with tissue tape for added interest and added texture to my background with Tim's Subway texture fade.


Sarah is mad about Studio 490 flowers and flutterbys, but she thought it was high time to play with some new of Wendy's fabulous new Art Parts and stamps....
I really love the bold designs of Wendy's new range of Art Parts as there are so many ways you can play with them and I think Distress Stains are just the best way to colour them all! I was really happy to open my new packets of boards, frames, flowers and hearts - to name but a few.. I spent ages trying out all sorts of designs and ideas and then suddenly there seemed to be a 50's retro feel coming through with the stars, hearts and love pieces. So of course this lovely damsel was the perfect female focal point. Maybe it's my new baby girl making me feel all lovey-dovey but as you can see my creation is all about the home and heart.


Terry loves Everthing Wendy so this weeks theme was right up her ally.

I was sitting down at my table and had all these fabulous Wendy Vecchi Art Parts right in front of me and a spool, so I had an idea in my head and I just had to play around with the Flowers, Bugs and Butterflies, Leaves and this gorgeous stamp set from Wendy. For this project I also used Distress Stains, Glossy Accents, Crackle Accents and the Chicken Wire Stencil to create my project. I just Love to Make Art and I just love everything Wendy

Finally, I (May) will share my project - one of my favorite things to make this time of the year!
Wendy's pocket watch art part is by far my favorite - I love to turn them into ornaments and package toppers for the holidays! I used her cancelled postage stamp on my base, then added distress ink and layered on glitter, a festive flower, and just a few other little touches. Now my first package of the season is dressed and ready!
Thank you so much to Wendy Vecchi for joining us this week as both an inspiration and our special guest! Be sure to come back for her tutorials - in the meantime I encourage you to check out each of the design team member's blogs for more photos, supply lists, and more. Simply click on their name (above the photo of their project) to visit their blog.

Now that we've shared the team creations - we're ready to see yours! As always, Simon Says Stamp is giving away a $50 gift voucher that will go to a random entry chosen by Random Generator. The challenge will close at 11:59pm Eastern time on Sunday, October 28st and the winner will be announced during the following week. To qualify all you need to do is create a new project that ties in (in any way!) with our theme and post it, along with a link back to this challenge, and add a link here.
For the full rules, read the "challenge rules" posted in the side-bar here on our blog.

We can't wait to see what you make!


Friday, October 19, 2012

winners: rustification

Reminder: This week's challenge is still open - be sure to enter!
 
Now let's talk about last week's challenge winners! I'd like to thank Simon Says Stamp for another great chance to win a $50 voucher!!

The lucky (randomly drawn) winner for that is...

31 Claudine C

Congratulations! Please claim your prize within the next two weeks by emailing May with your details.

Now let's talk about the top 3 projects as chosen by the Stamp & Show design team. So many fantastic creations this week - the team had a tough time choosing! This week the honors go to:

25 butterfly
53 Leoni
62 Michelle

Be sure to visit their blogs and check out their amazing entries. So inspiring! Congratulations to each of you on a challenge well done! Please email May for the Top 3 Blinkie.
 
I'd like to thank everyone who took part in the challenge. It is always a joy to see what you create. I'd also like to say thank you again to Simon Says Stamp for their generosity - each week we give away a $50 gift voucher to the shop that you can use to buy all kinds of fabulous stamps, inks, and paper crafting supplies. Remember - you just need to enter the challenge each week to be entered into the drawing!

Monday, October 15, 2012

Challenge: Your Favorite

Favorites really are the best, aren't they? This week, we challenge you to share a favorite! This could be a technique, product, photo, idea, project type- or even a favorite theme. Anything goes as long as you have a note on what in your project is your "favorite".
 
 Let's check in with the design team and see what their favorites are...


Anna-Karin altered a blank wooden frame into something pretty special.
One of my favourite techniques is to build up layers of UTEE and stamp into it. Here I also added some black paint and Biscotti Perfect Pearls mixed with Perfect Paper Adhesive and brushed on the frame for lots of shine. This gorgeous face stamp from the Stamper’s Anonymous Classics #5 set fits perfectly into the frame. I embellished the frame with a word stick, Vintaj piece, facet, philosophy tag, mini gears, game spinners, and corked vials filled with inspiration. The metal pieces were aged using the Weathered Copper inks.


Halloween is one of Sandra Mouwen favorite themes. She loves the spookiness of it!
Halloween seems like so much fun. I wish they celebrate it more in The Netherlands so I could experience it like I should! Last year I bought the Halloween Silhouette Embossing Folder and haven't had the change to use it yet. So on its first use I it got all dirty by inking it up with the Fall Distress Inks. I inked the raised areas with some Black Soot Distress Ink. To make it a bit interactive I inked up some tags and folded them as flaps.
 
 
Trace wanted to combine a few of her favorites, so she made a mixed media board full of "wear your sunglasses " bright colours and a big shiny heart.
Bright colours just make me happy, and pink and red together are one of my favorite colour combos! The background on this mixed media board has many layers of mediums... Jenny Bowlin chewing gum paint, Dylusions bubble gum pink ink spray, and Fabel Castels Big Brush Pens and Pastels. I adore hearts on projects, so I knew I really wanted to add one big shiny statement heart to the center. Rangers Foil Sheets are so easy to work with to give you that shine. I added many different pink and red shades of Rangers Alchol Inks and accented it with my Krylon Silver Leaf pen.


Halloween is also a favourite for Tracy, showcased in her spooky rust like coffin.
I have to say a huge THANK YOU to my fellow teamie Candy,  for sending me some fabulous Halloween goodies to play with, she knows me so well!  These wonderful gifts including the coffin inspired me to create this spooky piece. Halloween being a favourite for me, I like to make the most of every opportunity to indulge my passion for anything spooky. Using the On The Edge Ornate die gave a perfect trim for my coffin, but this time around using the negative cut out. I love the little spider cut using the Memory Box Dangling Spider die along with the fabulous dimension created from Melissa Frances Pearls. But does my coffin hide a TRICK or TREAT?
 

Ashli's favorite supply is patterned papers and for this week, she is not holding back!
I can't help it. I am totally in love. In love with patterns, especially tiny repeating patterns. Echo Park's Everyday Eclectic collection has the perfect mix of whimsy, color, and of course pattern. For this week's theme, I am putting all of these papers to work on this photo-less layout that will be the cover page to my 2012 album. After selecting my most favorite pattern for the background, I cut up the journaling card sheet and layered those bits up with some messy-stitched circles. My favorite Thickers and wood veneer accents finish off my layout that is filled to the max with my favorite patterns!
 
 
Suzz is back to her favorite books. 
I was inspired by folding the pages of the books to create architectural features.  I took an old children's book and started folding the pages.  I added punched edges to create a beautiful arch.  After I finished the folding I sprayed the entire book with a coat of Dylusions Ink.   To frame out the ends of the book I created matching clocks. I cut the clocks from the Sizzix Tick Tock.  The birds and branches are nested in the pages of the book and are using it as there home.


I (May) loaded this tag with my favorite products and techniques!
From distress inks to stenciling, playing with resist prodcuts to aging with rock candy crackle I had an incredible time making this gift tag. Every single piece on here is a favorite - including my techniques. One of my favorite things right now is using stencils with a blending tool and distress ink - I love the color and all it adds to my projects.

 
Terry's favourite technique is embossing, she made an embossed Christmas envelope with Tim's technique.
I really love the Christmas holidays and making presents for everyone, Christmas time is the best time of the year for sharing love and gifts to the loved ones in your life. I started out with a Envelope and played around with the Silver Shiny material. I embossed the sentiments from Tim's stamp set Silhouettes and sprayed lots of glimmer mist on top to give it more shine on top. The snowflakes and deer are also from the stamp set, the perfect set to use for making Christmas gifts. And a fun thing to play around with is Utee, to see the melting process that is just great and then to create something with it. The Metal Letters are so much fun to play around with, so this time I put them onto a rope. A nice way to finish the Christmas envelope.


Dan's favourite product line is Tim Holtz's Distress range, and he's used both the stains and ink pads on these business card matchbooks.
I had the idea for this project when I was absent-mindedly staring off into space and my eyes fell on my Tonic mini perforator tool.  It's pretty essential for this, without it those business cards just aren't going to tear off nicely!  I used Distress Stains to colour the matchbook outers before embossing them with my Cuttlebug and a range of embossing folders.  Finally I applied a light coat of walnut stain Distress Ink to pick out the details.


Sarah just loves to play around with her stamps collections to create master-boards at the moment and that was the inspiration for her mixed media card...
I just love rubber stamps in all designs, shapes and sizes and there is no better way to play with them all than on a stamped master-board. It gives me the chance to combine all my favourite designs and create a harmonious base from which I can cut various shapes to use in my crafting. I've gone for hearts, a fabulous Wendy Vecchi sentiment and torn dictionary pages - all three being top of the list of my favourite 'go to' crafty ideas... A splash of Dylusions Ink Spray adds that little bit of wildness which always does me good.
 

One of Candy's favorite times of year for crafting is Halloween.  She has combined that with her love of creating dimensional pieces in this surprise jack-in-the-box.
 I totally love Halloween for crafting!  Whether you're a fan of cuter, grungier or classic vintage images; there are tons of products to incorporate into your Halloween creativity.  I also love dimensional and interactive home decor pieces.  So, I combined those things to create this 4x4 jack-in-the-box featuring those wonderful vintage Halloween images from Graphic 45 Happy Hauntings 8x8 paper pad.  Every side has a different scene.  Some embellished with Black Diamond, Platinum and  Paprika Stickles.  Others featuring Tim Holtz Ideaology Foliage flowers or Seasonal Halloween Muse Tokens.  Open the top and a surprise vintage moon man greets you!
 

I had a great time with this challenge, and encourage you to check out each of the design team member's blogs for more photos, supply lists, and more. Simply click on their name (above the photo of their project) to visit their blog.

Now that we've shared the team creations - we're ready to see yours! As always, Simon Says Stamp is giving away a $50 gift voucher that will go to a random entry chosen by Random Generator. The challenge will close at 11:59pm Eastern time on Sunday, October 21st and the winner will be announced during the following week. To qualify all you need to do is create a new project that ties in (in any way!) with our theme and post it, along with a link back to this challenge, and add a link here.
For the full rules, read the "challenge rules" posted in the side-bar here on our blog.

We can't wait to see what you make!